Summary
Solstice turns a sample into a playable sound map. Instead of moving through the sample from start to finish, you move around a map of related tones and textures.
What’s new in 1.2
This guide is written for Solstice 1.2. The last public production release was 1.1.4.
- Basic MPE support.
- MTS-ESP support.
- Five spectral effects:
texture,tilt,flutter,stretch, andbloom. crisppitch shifting.- Saturation and glue.
- Reverb modulation control.
- Auto root note detection.
Quick start
Get started in 60 seconds:
-
Load Solstice on an instrument track or open the standalone app. The default preset loads automatically.
-
Click anywhere on the map. Sound should play, with glowing cells showing the active position.
-
Drag across the map while holding. You should hear the sound move smoothly between brighter, darker, noisier, or steadier areas of the sample.
-
Try a different preset. Click the preset name in the top left to open the preset browser. Loading a new preset also loads its sample and updates the map.
-
Open the parameters panel with the button on the right side and move a few controls. Start with
spread,texture / tilt,bloom, orverb dry/wet. -
Arm the instrument track in your DAW and play your MIDI keyboard. The notes set the pitch. The map position changes the colour of the sound.
Tip: Turn off click-to-play
for MIDI-only performance without mouse note triggers.
Installation
System requirements
- macOS 10.14+ or Windows 10+
- AU, VST3, or Standalone on macOS
- VST3 or Standalone on Windows
- Available disk space: 150 MB
Installation
Run the .pkg installer on macOS, or the .exe installer on Windows. Plugins and factory samples install to standard system locations. Optional preset and sample packs install in their own Packs folders. See File paths.
Activation
- You need an internet connection on first launch to authenticate your license key, or to start the 30-day free trial.
- Your license works offline for one year after activation, then needs an internet connection to refresh.
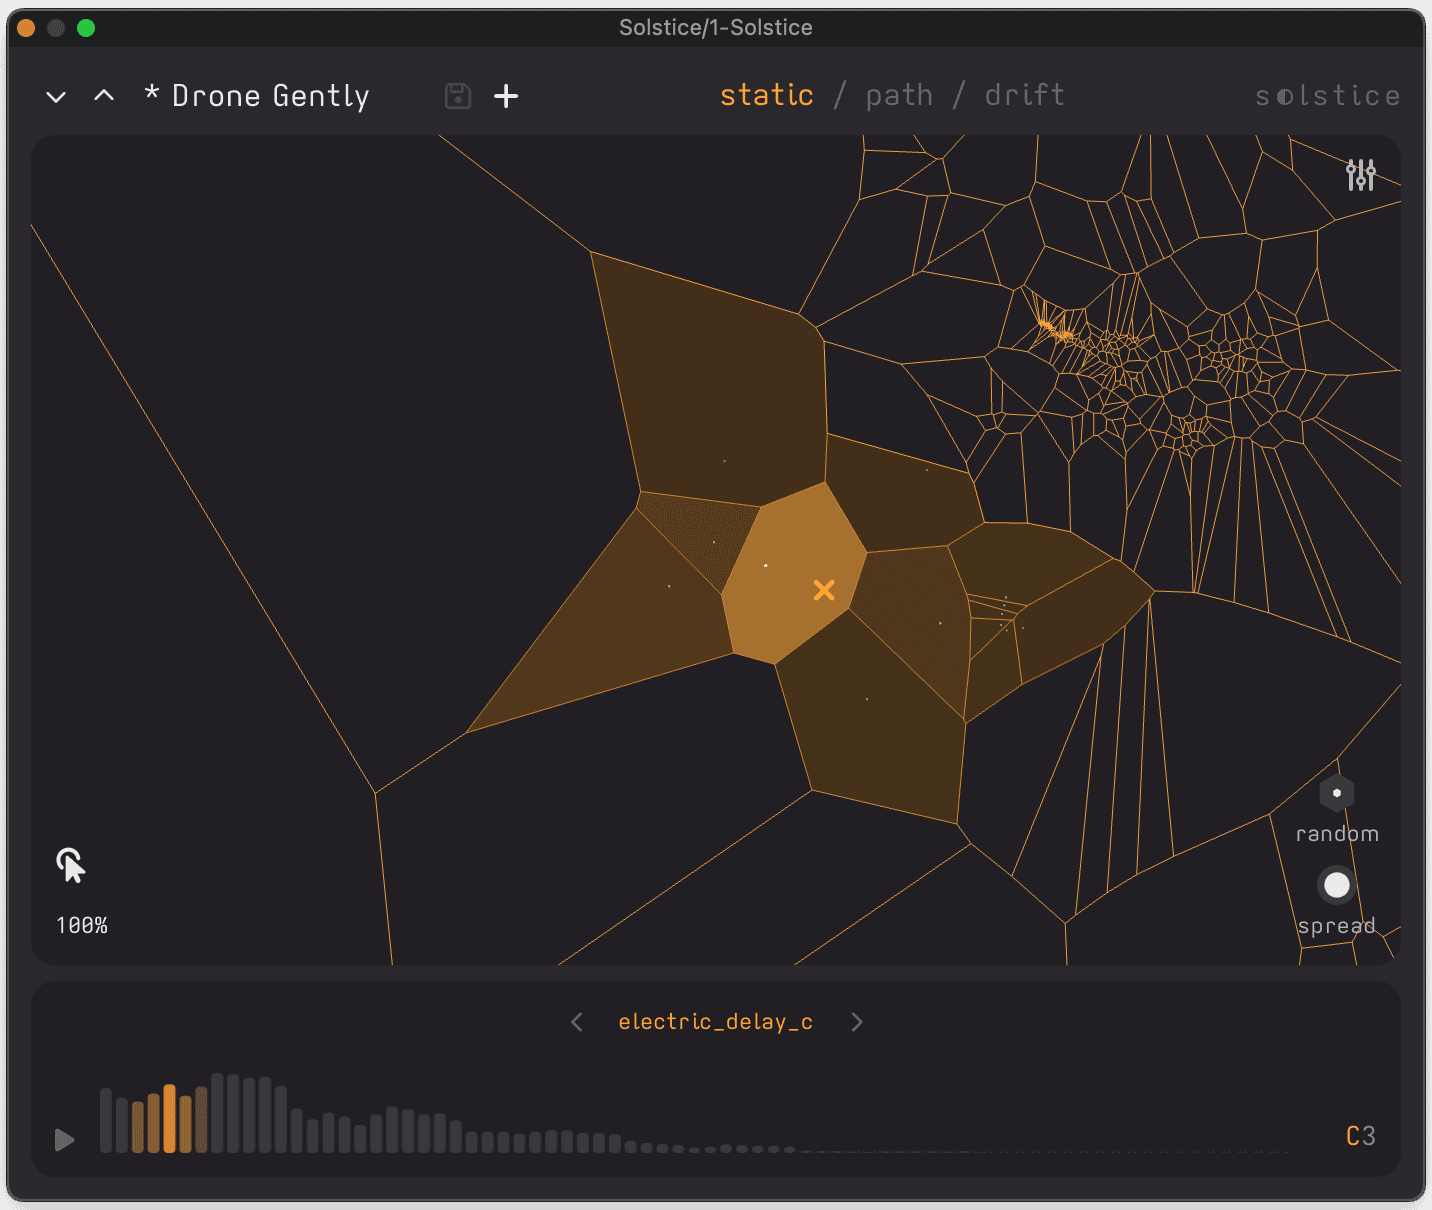
The interface

Solstice has five main areas: the header, the map, the mode selector, the parameters panel, and the sample/preset area.
Header
- Preset controls: The preset name opens the preset browser. Arrow buttons step through presets. The save and
+buttons handle user presets. - Mode selector:
static,path, anddriftdefine how the playhead moves. - Settings: The three-dot button in the top-right corner opens the settings modal for display, MIDI, tuning, and performance options.
- Parameters: The parameters button opens the expanded panel on the right.
The map
The map shows where similar parts of your sample live. Sharp attacks often sit away from steady tones. Dense areas usually contain sounds that occur more often. Glowing cells show the parts being played.
Important: The X and Y axes do not represent time, pitch, or another simple scale. Nearby cells usually sound related. Distant cells usually sound more different.
How it works
Solstice analyses the sample, splits it into small slices, compares them, and places related ones close together on the map. That lets you hold one area, move to another, or blend between them without following the original sample in a straight line.
Map navigation
| Buttons and shortcuts | Action |
|---|---|
| Click | Trigger middle C at that playhead position |
| Click + Drag | Move the playhead smoothly between frames |
| Scroll vertically | Zoom in or out around the cursor |
| Ctrl/Cmd + drag | Pan when zoomed |
| zoom control icon | Drag to change zoom level, or double-click to reset |
| click to play icon | Turn click-to-play on or off |
Lower section
- Sample area: Preview the loaded sample, adjust root note and cents, reset to the detected pitch, and control stereo width when stereo material is loaded.
- Sample browser: Open from the sample name at the bottom of the window to load factory content, user content, or any installed pack folders.
- Preset browser: Open from the preset name in the top left to search, filter, sort, favourite, and manage presets.
Playhead modes
There are three playhead modes. Each has its own colour scheme.
staticstays where you put itpathfollows a drawn routedriftmoves on its own while still reacting to the sample
| Mode | Movement Source | Key Parameters | Best For |
|---|---|---|---|
| Static | Mouse position | Spread, Random, Stick | Precise selection, layering, exploration |
| Path | Drawn route | Speed, Sync, Direction | Rhythmic patterns, looping gestures |
| Drift | Follows sample progression | Force, Rate, Spread | Slow movement, unstable textures |
Static mode

Manual playhead control. The playhead stays where you put it.
- Spread (0,20): Blends in more nearby frames. Lower values sound more exact. Higher values sound smoother and wider.
- Random (0,1): Adds small movement around the chosen position.
- Stick: Holds the chosen position after you release the note. Useful for frozen tones and layered chords.
Best for precise selection and exploration.
Path mode

Automated movement along a drawn route. Drag the path handles to reshape it.
- Direction: Forward, Bounce, or Loop.
- Speed: Sets how fast the playhead travels.
- Sync: Changes the speed control from free movement to tempo-synced note values.
- Spread (0,20): Same as in Static mode.
- Random (0,1): Same as in Static mode.
Best for rhythmic patterns, loops, and controlled movement.
Drift mode

Follows the sample more loosely. force sets how closely the playhead follows the original sample. rate sets speed and direction.
- Force (0,1):
1.0= exact playback following the original timeline0.5= partial movement with loose variation0= frozen texture with no forward energy
- Rate (-1,1):
1.0= normal forward speed0= stopped-1= full-speed reverse
- Spread (0,20): Same as in Static mode.
- Random (0,1): Same as in Static mode.
Low to medium force settings are often the most useful. The sound keeps moving, but it does not feel tied to the original sample.
Tip: Set
forceclose to0with a longrelease, then click different positions to build layered frozen textures.
Parameters panel

Access the panel with the parameters button  .
.
Tip: Hold
Shiftwhile dragging for fine control.
The panel runs from play and tuning at the top to space and output lower down. A good place to start is spread, texture / tilt, bloom, and verb dry/wet.
Play
This section changes with the selected playhead mode.
- Spread: How many nearby frames are blended in. Higher values sound smoother.
- Random: How much the playhead moves around the chosen area.
- Stick: Static mode only.
- Direction, Sync, and Speed: Path mode only.
- Force and Rate: Drift mode only.
Tune
- Mode: Pitch quality mode.
crispgives cleaner pitch shifting.lofiis rougher and more textured. - Octave: Broad transposition.
- Semitone: Semitone shift around the current root note.
Env.
Standard amplitude envelope:
- Attack
- Decay
- Sustain
- Release
Spec.
- Texture / Tilt: Texture changes how much background detail stays in the resynthesis. Tilt moves the sound darker or brighter.
- Flutter: Adds phase and pitch movement. Low values can soften metallic artifacts. Higher values add stronger motion and a wider, less steady tone.
- Stretch: Changes the spacing between partials. Positive values push the sound toward more inharmonic, metallic tones. Negative values squash the partials closer together, giving a denser sound that still stays inharmonic.
- Bloom: Reshapes the harmonic profile. Positive values sound brighter and more saw-like. Negative values sound rounder, heavier, and more odd-harmonic-focused.
Sat.
- Dry/Wet: Blend between the clean signal and the saturated signal.
- Drive: Add more bite, density, and edge.
- Colour: Shift the saturation from more neutral to warmer and darker.
Filter
- Type: Lowpass, Bandpass, or Highpass.
- Freq: Move the filter up or down the frequency range.
- Resonance: Add more emphasis at the filter point.
Verb
- Dry/Wet: Blend between the dry sound and the reverb.
- Size: Choose a smaller or larger space.
- Decay: Shorten or lengthen the reverb tail.
- Tone: Make the reverb darker or brighter.
- Mod: Modulates the reverb's internal delay lines. Higher values add more movement and chorus-like character.
High decay and brighter tone settings can create long drones.
Output
- Glue: Levels the dynamics - quiet components come up, loud ones are tamed. Makes the sound denser and more even.
- Gain: Final output level, now shown with a live output meter.
Samples

Click the sample name at the bottom between the arrows to open the sample browser. From here you can load factory folders, user samples, or installed packs.
Browser navigation:
- Select a folder on the left, then a sample on the right.
- Use the arrows to step through other samples in the current folder.
Loading samples

There are two ways to load your own samples:
- Drag and drop: Drop files directly onto the map.
- Upload via browser: Open the sample browser, then click the upload sample button

Supported formats:
- WAV
- AIFF
- FLAC
- MP3
Samples over 2 minutes are automatically clipped on import.
What works best:
- Single notes or simple chord progressions
- Sounds with clear tonal or textural variation
- Field recordings with diverse textures
- Samples under 30 seconds for the fastest, most responsive results
Sample history
Every sample you load is copied to your user folder, so you can find it again later.
Sample waveform preview

- Play button: Preview the whole sample.
- Click on waveform: Preview from that point in the timeline.
- Stereo waveform: Stereo files display as stereo, and a Width control appears when stereo material is loaded.
- Root note: Sets the sample's pitch reference. The default is
C3. - Root note cents: Fine-tune the root note in cents.
- Reset to detected pitch: When Solstice detects a reliable root note, a reset button appears so you can jump back to it quickly.
Browser actions
Right-click a user sample in the browser to:
- Reveal it in Finder or Explorer
- Delete it from your user library
Factory content and installed pack content are read-only from the browser.
Sample processing
When loading a sample, Solstice copies it to your user folder, analyses it once, stores the result, and builds the map.
Presets

Presets store the current parameters, playhead settings, and sample reference.
Loading presets
- Click the preset name in the header to open the preset browser.
- Click a preset to load it.
- Search by preset name or tags.
- Use filter and sort controls to narrow the list.
- Use the arrow buttons in the header for sequential browsing. This follows the active filter state.
Note: Click the preset name again to close the browser.
Filter and sort

Click filter  or sort
  to organise the presets.
- Search: Matches preset names and tags.
- Mode filters:
static,path, anddriftwork as an OR filter. - Content tags: Selected content tags must all match.
- Special filters:
favouriteshows starred presets. - Origin filters:
factoryanduserare mutually exclusive. - Pack filters: Installed packs appear as their own filters.
- Sorting: Last created, last modified, or alphabetical.
If the preset list looks empty, clear the search field and active filters first. A few filters narrow the list quickly. Pack filters only show presets from that pack, so they hide the regular factory and user lists while active. Start with search only or one filter at a time.
Saving presets

- The save button overwrites the current user preset when it has been modified.
- The
+button creates a new preset from the current state. - Factory and pack presets are read-only, so saving is disabled for them.
Preset list

- Heart icon: Add or remove favourites.
- Name: Followed by the first three tags.
- Mode symbol: Indicates the preset's playhead mode.
- Factory icon or pack icon: Shows the preset origin.
- Three dots (user presets): Open preset editing actions.
Right-clicking a user preset also opens edit and delete actions.
Missing or corrupted presets
If a preset's audio is missing or the preset cannot be resolved cleanly:
- The preset name appears red in the browser.
- Hovering can reveal the missing audio path when available.
- Load the preset, then replace the missing sample and save again.
Sharing presets
Presets reference samples using relative paths. To share:
- Copy the
.xmlfile from your user preset folder - Include the matching audio sample
- Place both files in the corresponding preset and sample folders on the receiving system
Settings
Open Settings from the top-right ellipsis in the header.
Display

Use the size control to scale the interface.
MIDI

The MIDI tab covers standard pitch bend and basic MPE support.
- Global pitch bend: Sets the ordinary pitch-bend range. The default is
+2. - MPE: Enable or disable MPE support.
- Zone: Choose lower or upper zone.
- MPE pitch bend: Sets the per-note pitch-bend range. The default is
+48. - Slide target: Route slide to
tilt,texture,stretch, orbloom. - Slide amount: Sets how strongly slide affects the chosen target. The default is
60%.
Slide affects one target at a time, in both directions around the current setting.
If you are using an MPE controller, make sure the controller and Solstice use the same zone and pitch-bend ranges.
Tuning

Enable MTS-ESP here when working with an MTS-ESP master. When connected, the tuning tab shows the current scale name. Otherwise it shows not connected.
Performance

multithreaded [beta] enables multithreaded voice generation. It can improve performance on some systems, but it is still experimental. If playback becomes unstable, turn it off first.
MIDI implementation
Use this section for MIDI control and host mapping. For MPE and tuning setup, use the settings sections above.
MIDI input
- Note on and note off with velocity sensitivity
- Standard pitch bend for real-time pitch control
- Optional MPE support through
Settings > MIDI
MPE and tuning
- In the current MPE setup, pressure is hard-wired to per-note volume.
- Slide can be mapped to one spectral voice parameter at a time.
MTS-ESPsupport is enabled fromSettings > tuning.- For zone, bend range, slide target, slide amount, and
MTS-ESPstatus, see the settings sections above.
Parameter mapping
Most performance controls can be MIDI mapped:
- X/Y map position
- Path handle positions
- Mode-specific parameters
- Envelope, filter, reverb, saturation, spectral, and tuning controls
Workflow examples
Ambient pad
- Load a sustained sample such as strings, choir, or synth.
- Select
driftmode. - Set
forcearound0.3,ratearound0.5, andspreadhigh. - Add
verb, a littleglue, and a small amount of positivebloom. - Play chords from MIDI.
Rhythmic pattern
- Load percussive or sharply changing material.
- Select
pathmode. - Draw a route between contrasting regions.
- Turn on
syncand set the speed to a musical division. - Add a little
texture / tiltmovement orflutter.
Expressive stereo texture
- Load a stereo recording with obvious left/right movement.
- Select
staticmode and turnstickon. - Increase
spreadand adjustwidthin the sample area. - Tune the root note if needed, then reset to the detected pitch if Solstice found a better starting point.
MPE performance patch
- Open
Settings > MIDIand enableMPE. - Set the zone for your controller.
- Route
slidetotilt,texture,stretch, orbloom. - Use moderate slide amount at first, then widen it once the response feels right.
Technical notes
Audio support
- Formats: WAV, AIFF, FLAC, MP3
- Sample rates: 44.1kHz - 96kHz
- Bit depth: 16-bit, 24-bit, 32-bit float
- Channels: Mono and stereo
- Stereo control: Width parameter appears for stereo material
- Max length: 2 minutes (auto-clipped if longer)
Plugin formats
- macOS: AU, VST3, Standalone
- Windows: VST3, Standalone
Voice management
- Maximum voices: 16 simultaneous
- Voice stealing: Oldest note is replaced when the limit is reached
- Each trigger: Creates a new voice layer with its own envelope
Troubleshooting
No sound output
- Verify track routing in your DAW.
- Check MIDI input assignment.
- Ensure click-to-play is enabled if you are trying to audition from the mouse.
- Confirm that a sample is loaded.
Audio artifacts or metallic sounds
- Increase
spreadfor smoother blending. - Try low
fluttervalues (0.1-0.5) to soften metallic artifacts. - Apply a lowpass filter.
- Lower reverb
tone. - Try a sample with less noise content.
Stereo width is missing
- The
widthcontrol only appears when the loaded file contains stereo material. - Mono files load and play correctly, but they will not show the stereo width control.
Sample loading issues
- Confirm the format is WAV, AIFF, FLAC, or MP3.
- Check that the file is not corrupted.
- Verify that the sample is under 2 minutes.
Preset issues
- Red preset name: The preset is missing audio or has a broken sample reference.
- Cannot save: Check write permissions for your user preset folder.
- Filters seem wrong: Clear active filters and search terms, then try again.
MPE is not responding
- Make sure MPE is enabled for the instrument in your DAW. For example, in Ableton Live, right-click the device title bar and enable MPE mode.
- Make sure
MPEis enabled inSettings > MIDI. - Check that Solstice is set to the same lower or upper zone as your controller.
- Confirm that the controller and Solstice use matching pitch-bend ranges.
MTS-ESP is not connected
- Make sure
MTS-ESPis enabled inSettings > tuning. - Confirm that an MTS-ESP master is running on the system.
- If the tab still shows
not connected, verify the tuning master before troubleshooting Solstice itself.
Multithreaded mode behaves strangely
- If you are seeing CPU spikes or timing issues, try toggling
multithreaded [beta]inSettings > performance. - It can help on some systems, but it is still experimental and may not behave the same in every host or render path.
- If playback or offline rendering becomes unreliable, turn it off again.
Support
If you cannot find the answer to your question, please contact support@minuit.am.
File paths
macOS
- Factory presets:
/Library/Audio/Presets/Minuit/Solstice/Factory - User presets:
~/Library/Audio/Presets/Minuit/Solstice/User - Pack presets:
/Library/Audio/Presets/Minuit/Solstice/Packs/<PackName> - Factory samples:
/Library/Audio/Sounds/Minuit/Solstice/Factory - User samples:
~/Library/Audio/Sounds/Minuit/Solstice/User/Custom - Pack samples:
/Library/Audio/Sounds/Minuit/Solstice/Packs/<PackName> - Log files:
~/Library/Logs/Minuit/Solstice
Windows
- Factory presets:
%ProgramData%\Minuit\Solstice\Factory - User presets:
%APPDATA%\Minuit\Solstice\User - Pack presets:
%ProgramData%\Minuit\Solstice\Packs\<PackName> - Factory samples:
%ProgramData%\Minuit\Solstice\Sounds\Factory - User samples:
%APPDATA%\Minuit\Solstice\Sounds\User\Custom - Pack samples:
%ProgramData%\Minuit\Solstice\Sounds\Packs\<PackName> - Log files:
%APPDATA%\Minuit\Solstice\Logs
Quick reference
Keyboard and mouse shortcuts
Shift + drag- Fine control for parameters and root-note centsCmd/Ctrl + drag- Pan when zoomedScroll- Zoom in or out at the cursor
Click behaviours
- Map click: Trigger middle C at the selected map position
- Waveform click: Preview the sample from that point
- Click-to-play off: Use the map for positioning only while performing from MIDI
Tips for best results
- Use samples under 30 seconds for the fastest workflow.
- Start with factory presets to understand the three playhead modes.
- Simple harmonic material and single notes often produce the clearest maps.
- Try a few zoom levels. Different views reveal different relationships in the map.
- Soften harsh sounds with lowpass filtering, reverb, higher spread,
flutter, or gentlerspec.settings. - If you are not sure where to start, load a factory preset and begin in
staticmode.